From Spaces to WordPress step by step. General Settings.
October 5, 2010 13 Comments
4. Changing those General Settings.
In later posts, we will continue to tweak our new theme by giving it a header and a background, but for the next few posts, I intend to take you through adjusting the basic settings that you may need to change in your WordPress Dashboard. I feel that the Dashboard is one of the best there is, but it contains so many areas to tweak and set up, that it can be a daunting task to anyone who is new to WordPress.com. It would take far too many posts for me to cover every single choice and area covered by the Dashboard, so I intend to only cover those areas that I feel are the most likely to need changing by most new users. So, let’s make a start shall we?
1. Click on My Blog from the WordPress Navibar above your blog, and then select Dashboard from the drop down list.
2. From the left hand Dashboard sidebar, click on Settings right at the bottom of the sidebar contents.
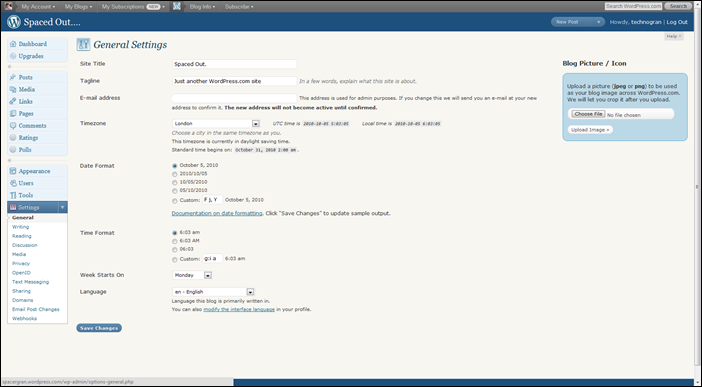
3. You will now be in the General Settings page. Firstly you can change the title of your blog by editing the text in the Site Title box.
4. Next choice that you can change is the Tagline that shows in your header area and will replace the default ‘Just another WordPress.come site’ I’m going to change my tagline to ‘Out of this World!’
5. The next setting E-mail address, allows you to change the email address to be used by WordPress.com when they need to send you any news, or if you subscribe to anyone’s blog for example. If you wish to use a different email address to the one that you initially used when first setting up your blog on WordPress, then simply type in your new email address into the box, and WordPress will send you an email to this new address in order to confirm and verify it. All you will need to do will be to click on the link contained in it in order to verify your new address.
6. Timezone is the next choice of setting, and if you click in the box, you will then be presented with a drop down list of different countries to choose from.
7. Following that choice is Date Format, and this allows you to choose how you want the date to appear on your blog posts. Simply click inside the circle next to your preferred format.
8. Again, Time Format uses the same procedure, so simply click in the circle against your chosen time format.
9. Week Starts On. When do you prefer your week to begin on WordPress? Click inside the box to change.
10. Language. Which language do you want to use for your blog posts? Click inside the box to change.
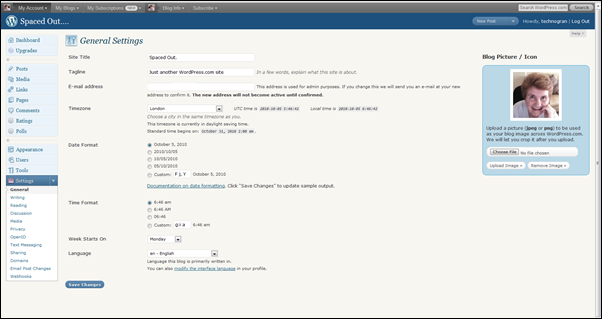
11. Over at the top right of this page, you will have noticed Blog Picture/Icon. This allows you to use a picture in order to personalise your presence all over the WordPress site. It will be used next to any comments that you leave on other users blogs, and it also shows if you make your WordPress blog a favourite in most browsers favourites toolbar.
12. To use a photo or picture, simply click on Choose File, a window will open allowing you to choose a picture or photo from your computer. Next click on Upload Image.
13. When your new photo has been uploaded, you will be able to crop it by moving the crop square around. NOTE! The square can be made larger by clicking on the squares and then dragging them sideways. As soon as you are happy with the photo or picture, click on Crop Image to save it.
14. Click on Back to Blog Options to return to your General Settings page, and then click on Save Changes at the bottom of this page when you are finished.
Next post, we’ll work our way through the other settings that you may want to make changes to such as the Writing, Reading , Discussions and Privacy areas.
TG


thanks so much technogran, I can see you’re going to prove invaluable in this transition!!! x
That’s okay Karen. Lot’s more to work through and I am glad that you are finding them useful. Do let other ex Spacers know where my step by step instructions are won’t you? Thanks
TG
HI there TG,
I’m letting as many people know as I can. about your site full of advice to spacers transferring, It can be so mind bending to be left with rows and rows of info, and no idea what to do first..
I just jumped in at the deep end and spent a whole day just trying everything out, like a kiddie in a sweetshop.
I’m still enjoying all the features, esp. Blogsurf…. carry on the good work,
xPenx
Thanks Pen. I am grateful for your comments and for pointing others over here. WordPress do have their own help as well to help users get used to the site. Take a look at their help videos here at http://wordpress.tv/flavor/wordpresscom/ where you will find lot’s of useful videos to watch which take you through some of the settings on here.
One question I have at the moment.
How do I stop my email address being published with every comment I make?
Hasn’t published on here has it? It shouldn’t show on any comments you make as its not used to make a comment. However, you do need to have a WordPress user name and password to make a comment Lost in France.
Thanks! I really am so glad yu are good at explaining all this to us let “WordPress” savey!
I am sure I will be checking in often!!!
Thank you for your comment and praise. I have tried to give help to Windows Live users for ages, so I am just continuing that assistance and help as WordPress can take some getting used to.
Thanks Technogran…just added a tag and changed my picture…now to check out the next little bit…!
Thanks Technogran…have just added a Tagline and changed my picture, so now onto the next little ‘tweak’!
Oops! I thought my first comment had vanished or not posted…I didn’t realise it went to the top! LOL!
I can send new comments to the bottom if you prefer! 😉 Nice that we have a choice on here of stating how we want our comments to look and in what order. Suppose that new comments going to the bottom is more Spaces like……..
Pingback: Spaces to WordPress – new Look, new Language | This 'n That